How to build ticketed events
This section outlines the process for creating a Ticketed event. A Ticketed event is appropriate if the event requires constituents to purchase a ticket to attend.
Once this attendance option has been selected in Luminate Online, and should your event not require a ticket, you will need to recreate the event.
Online assistance for creating Ticketed events can be found by selecting Help >> Help for this Page in the top right hand corner of the Luminate Online Administrative system. You may also contact (lo-support@uwo.ca) if you need further assistance.
To watch a video tutorial on this process see Appendix E.
Preparation
Gather the event details
- Name
- Location (including venue, street address, city and province, state or country if outside of Canada or the U.S.)
- Date
- Time (start & end)
- Ticket purchase deadline
- Type(s) of ticket(s)
- Name(s)
- Price of each type of ticket
- Total number of each type of ticket available
- Ticket purchase limit/person for each type of ticket
- Description of each type of ticket (optional)
- Any questions or options you’d like registrants to answer and whether or not they are mandatory (i.e. entrée selection; food allergies; play on the same team as; etc).
- NOTE: four standard questions to be included for ticketed events are:
- Are you a Western alumna or alumnus? [mandatory to answer]
- If you are a Western graduate, please enter your degree and year of graduation (i.e. BA’83):
- Please enter your guest name(s) as well as Western degree(s) and graduation year(s), if applicable:
- How did you find out about this event?
- NOTE: if the event tickets are going to be mailed to the purchaser, the following question should also be included:
- Please provide the address to which your tickets should be mailed:
- Event Reminder autoresponder subject line and email text, IF changes are being made to pre-populated content
- Is a URL shortcut required for the event? (A shortcut is an easy-to-remember URL that can be used in printed materials and advertising)
Write the event description
- This is your opportunity to sell your event. Make it sound appealing to attend. Tell prospective guests the benefits of attending. This copy should be more descriptive than the information in the evite or print invitation.
- Think like a prospective guest and include all of the information s/he would need to make an informed decision about attending the event. Take it one step further and also include any information an attendee would need to know.
- Luminate Online will automatically format the event name, location, date, and time. They will appear at the top of the event details page. As such, these items should NOT appear in the event description.
- Ticket cost and ticket purchase deadlines should always be included in the description.
- To comply with Western’s commitment to providing accessible service, include a contact for getting information in a different format or making alternative arrangements.
- Are ticket refunds available? If not, include the phrase, “Sorry, no refunds.”
- Check the copy for comprehension, spelling, grammar and punctuation.
- Do NOT format the copy. Formatting will be done in Luminate Online.
- Save the event description.
Sample description
Dr. Paul Davenport and Mrs. Josette Davenport invite you to join them for an exclusive engagement of Jersey Boys: The Story of Frankie Valli & The Four Seasons in support of The Talbot College Theatre Renovation Project in the Don Wright Faculty of Music.
Tickets are $100 per person in advance and include a pre-show reception and admission to the show.
The pre-show reception begins at noon followed by Dancap Productions presentation of Jersey Boys at 2:00 p.m.
A bus will be departing London (Westminster Hall) at 10:30 a.m. on Sunday the 19th at a cost of $30 per person. For anyone interested in taking the bus please contact Tricia at 519-661-2111 x85739.
Please register by Friday, October 17, 2016.
Western Alumni is committed to accessibility for persons with disabilities. Please contact us if you have any particular accommodation requirements or require information in an alternate format.
Collect and format images
- Freeimages, Pixabay, and Pexels are a good source of free stock images. Choose from the free images under “Results” and ignore those under “Premium results” unless you’re willing to pay for an image.
- Instructions for formatting the image can be found here. A couple of quick reminders:
- Images used on the web or in email should be saved at a resolution of 72 dpi
- A banner image for an event page must be 1170x x 375px
- If you need assistance, please contact lo-support@uwo.ca .
Create a ticketed event
Login
Login into the Luminate Online administrator web site at westernconnect.ca/admin
Follow the path content >> events
- The Event Calendar displays scheduled events as well as the option to create a new event.
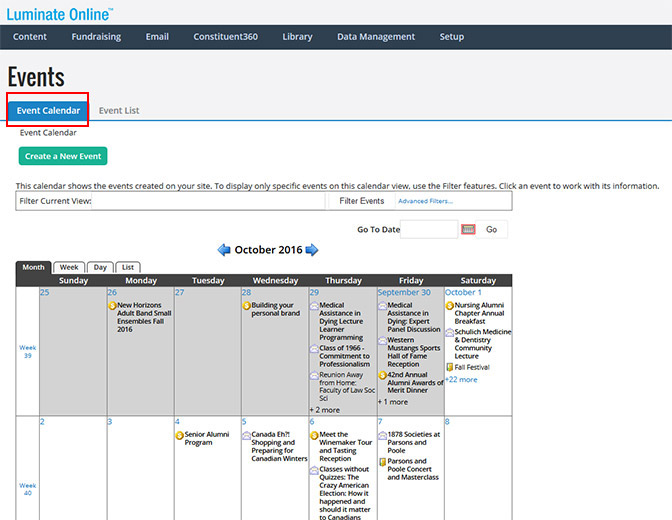
- The Event List displays all the events in alphabetical order plus a filter option to search for a specific event.
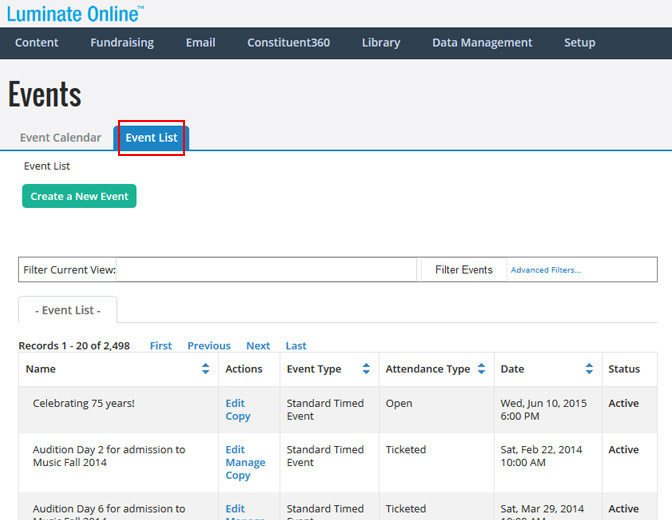
- To add an event click the Create New Event Button
Complete the fields under identify event
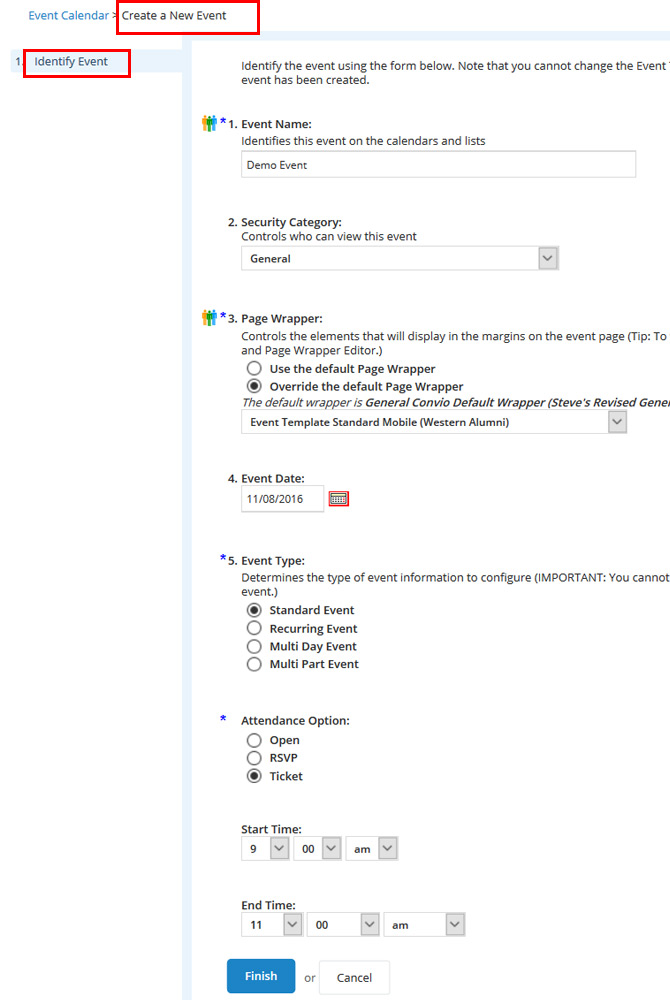
- Event Name
- This will appear in multiple places across the Events module. Keep it descriptive but succinct.
- Security Category
- Leave set to General unless you only want a select group of people to view the event. If this is the case, please contact lo-support@uwo.ca. (NOTE: only logged in individuals would be able to see the event).
- Page Wrapper
- Click the radio button beside Override the default Page Wrapper
- Select Event Template - Alumni from the drop-down menu if using the recommended standard event page banner layout
- Event Template - Schulich can be used if you are building a Schulich event.
- Event Template - Western can be used if you are building a non-Western Alumni event. It will replace the Western Alumni and BEX logo with plain Western branding.
- Event Date
- Set the month, date and year
- Event Type
- Determines the type of event information to configure
- Choose between:
- Standard Event (begins and ends at a specific time on a specific date; used most frequently at Western)
- Recurring Event (begins and ends at a specific time on a specific day and repeats according to a specified schedule)
- Multi Day Event (occurs over consecutive days within a date span)
- Multi Part Event (has a parent event with individual activities – referred to as child events – that can occur at various times across more than one date; each event has its own attendance options)
- Attendance Option
- Choose Ticketed.
- Other options include Open (appropriate if you do NOT need to know the number of people attending or to track anything about attendees later) and RSVP (appropriate if the event is free but registration is required)
- Remember, Event Type and Attendance Option cannot be changed after an event is saved. You have to start a new event from scratch.
- Set the Start Time and End Time
- NOTE: You must set an end time. If your event is not done at a specific time set the end time to 11:55 p.m. This MUST be done to prevent an exception in BBCRM</b >
- If an event has two parts (ex: a reception followed by a game), use the start time for the first part and the end time for the second part.
- See Event Description below for details on the inclusion and formatting of event parts in the event description.
- Click the Finish button at the bottom of the page.
- The event will be saved as a draft event in Luminate Online. You will be taken to the Identify Event page.
Registration page template
- On the Identify Event screen under 4. Registration Page Template:
- Select radio button beside “Custom (includes First Name, Last Name and Email and you can add additional Constituent profile fields)”
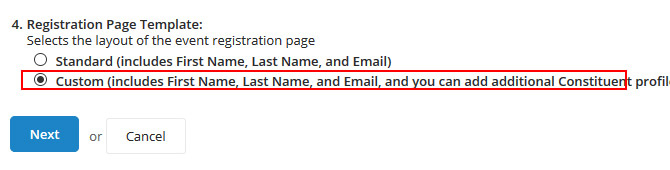
- Click the next button to display the Set Event Date page.
- Click next again to get to the Configure Additional Information screen.
Configure additional information
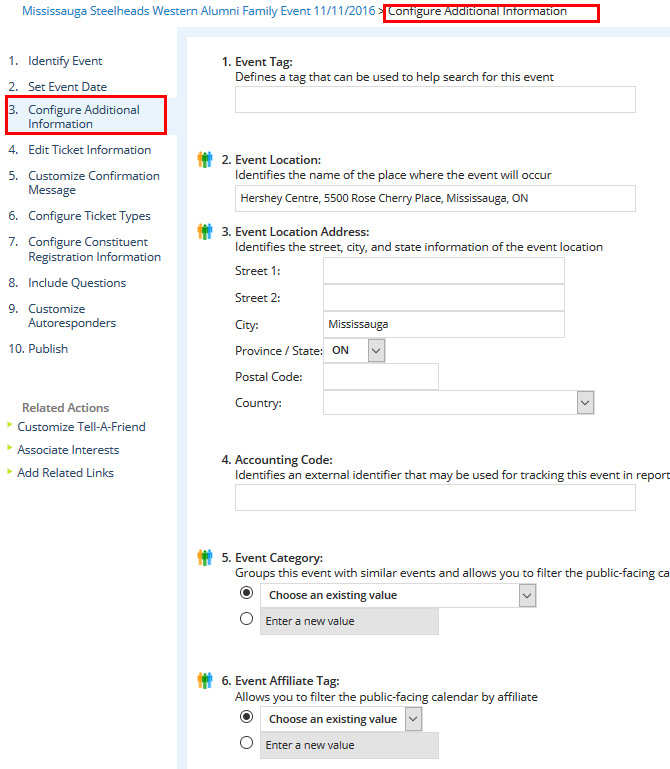
- Event Tag (Optional)
- Enter a word or phrase that others can use to help locate this event. For example, you can enter a well-known acronym or nickname for this event.
- Event Location
- Enter the full location information including:
- Venue name
- Street address
- City
- Prov/state OR Country for events outside of Canada and the U.S.
- Format location information as:
- John Labatt Centre, 99 Dundas Street, London, ON
- The Old Bank of England, 194 Fleet Street, London, UK
- Two–part events:
- Use the location of the first part in the Event Location field
- See Event Description below for details on the inclusion and formatting of event parts in the event description
- Enter the full location information including:
- Event Location Address
- For events within Canada or the U.S., complete the City and Province/State fields
- For events outside of Canada or the U.S., populate the City and Country fields
- NOTE: These are required to populate alumni event listings on the Alumni homepage (www.alumni.westernu.ca) and the Alumni Events page (www.alumni.westernu.ca/connect/events/)
- Accounting Code (Not required, leave blank)
- Event Category (Not required)
- Event Affiliate Tag (Not required)
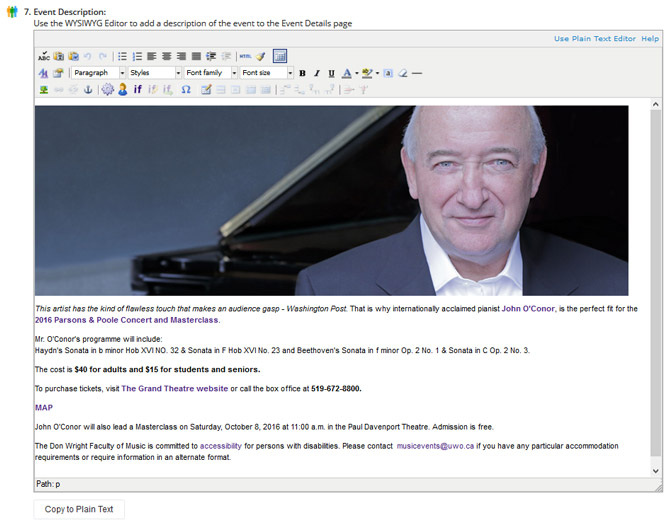
- Event Description
- Add the banner image at the top of the editor (See Appendix B: Insert/Edit Images if you need assistance)
- Add the event description text
- Open the text prepared in Word. Copy and paste it into Notepad.
- Copy and paste the text from the Notepad file into the WYSIWYG editor.
- Format the text in the WYSIWYG editor according to the following standards:
- Deadlines and costs, if included in the Open event description, should always be bolded.
- For example: Tickets are $70 per person. The ticket purchase deadline is Monday, January 7, 2008.
- For two-part events, include the names, start times and locations of both event parts and bold them.
- For example: The pre-game reception will be hosted at The Fox and the Fiddle in the Old Quebec Street Shoppes at 55 Wyndham Street North beginning at 6:00 p.m. Complimentary appetizers will be provided and beverages will be available at the bar.
The game takes place at the Guelph Sports & Entertainment Centre beginning at 7:00 p.m.
- For example: The pre-game reception will be hosted at The Fox and the Fiddle in the Old Quebec Street Shoppes at 55 Wyndham Street North beginning at 6:00 p.m. Complimentary appetizers will be provided and beverages will be available at the bar.
- Please do NOT use italics. Also, avoid the use of bold on anything other than the items identified above.
- Include any other images in the body
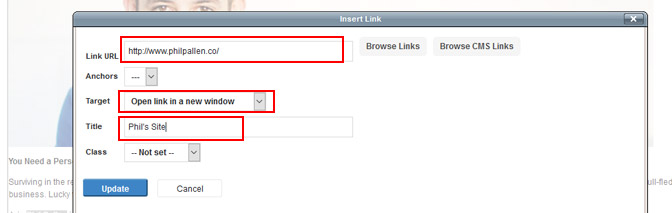
- Link “contact us” in the accessibility statement
- Highlight “contact us” in the accessibility statement
- Choose the Insert/Edit URL or Link button (
 ) in the toolbar at the top of the WYSIWYG editor.
 - In the Link URL field, enter mailto:prefix@uwo.ca (i.e. alumni@uwo.ca)
- Set the Target field to “Open in a new window”
- In the Title field, enter the contact’s name (i.e. “Western Alumni”)
- Click the Insert/Update button
- Deadlines and costs, if included in the Open event description, should always be bolded.
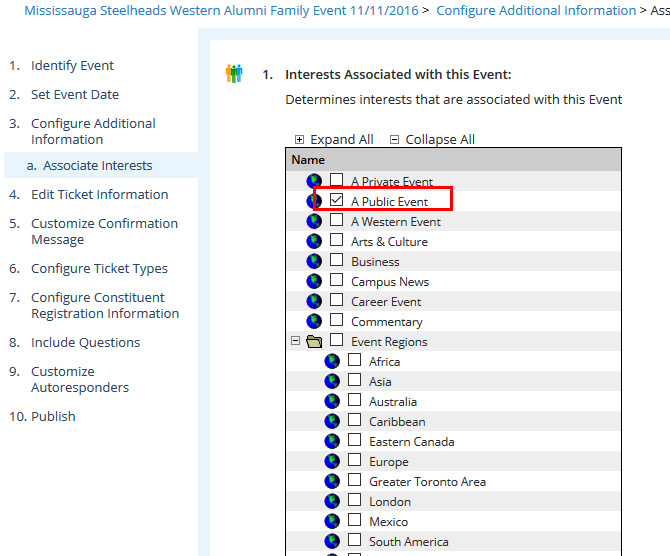
Associate interests
- Under Related Actions in the left sidebar of the Configure Additional Information screen, click Associate Interests.
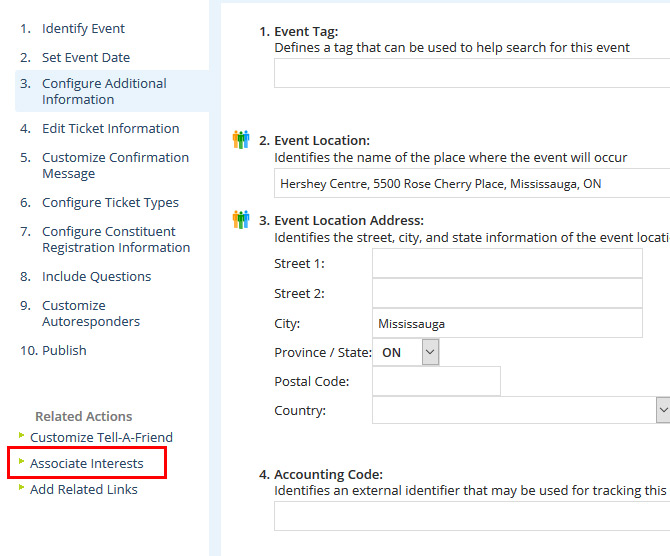
- On the Associate Interests screen:
- Mandatory selections are:
- A Public Event IF event is to appear on the Western Alumni events listing OR A Private Event IF event is by invitation only and/or is not to appear in the Western Alumni event listing
- The Event Region in which the event is being held
- Optional selections are:
- Featured Event IF event is to appear in the Events component on the Stay Connected and Get Involved splash pages
- Sports IF event is an Athletic Alumni event
- Homecoming Event IF event is to appear in the Homecoming Event listing
- Homecoming Featured Event IF event is a Western Alumni event and is to appear under on the homepage of the Homecoming site
- Select “A Private Event” if the event is by invitation only and/or is not to appear in the Alumni Western event listings.
- Mandatory selections are:
Edit ticket information
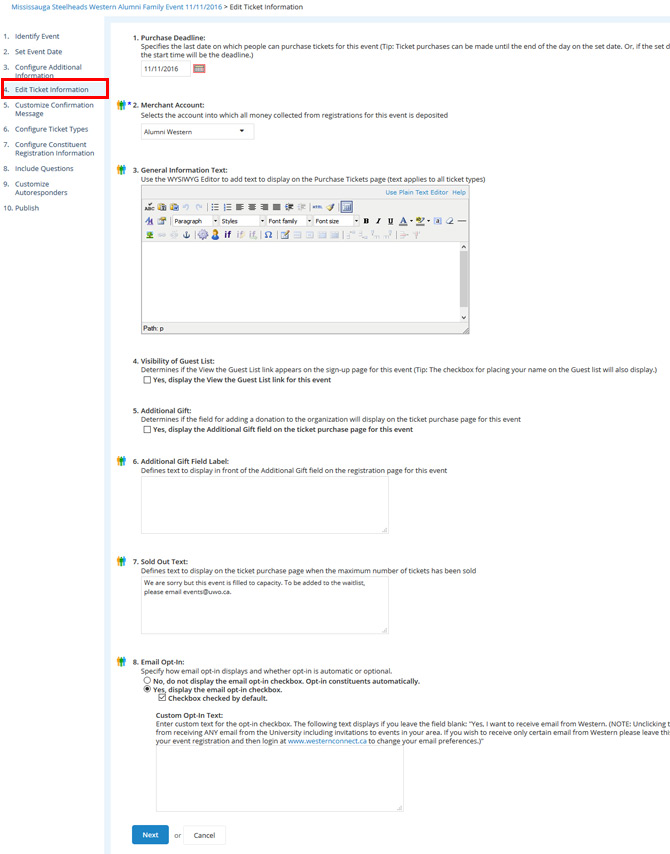
- Purchase Deadline
- Enter the last day on which people can purchase their tickets for this event. You can manually type in the date or choose the Calendar icon to select the date from the calendar selector page displayed.
- Merchant Account
- Choose UWO BBMS Alumni Ticket Sales from the drop-down list.
- THIS IS VERY IMPORTANT TO ENSURE FUNDS FROM TICKETS FOR THE EVENT ARE TRANSACTED THROUGH THE CORRECT BANK ACCOUNT.
- General Information Text
- Enter content that applies to all tickets to display at the top of the ticket purchase page. (OPTIONAL)
- Visibility of Guest List
- Leave this field unchecked.
- Additional Gift
- This option would only be used for those events where registrants may add a donation to their ticket purchase.
- IF using this option, you must first contact Annual Giving and Finance & Budget. You must also notify Mark (mkoopma@uwo.ca).
- Leave the “Yes, display the Additional Gift field on the ticket purchase page for this event” checkbox unselected if you do not want to allow people to give a donation at the time they purchase tickets.
- Or, choose the checkbox to display this field.
- Additional Gift Label
- This field is only required if registrants are provided with the option to include a donation.
- Enter the text to display in front of the Additional Gift field.
- For example: If you would like to make an additional contribution to the Talbot College Theatre Renovation Project, please enter it here.
- Sold Out Text
- Enter the following standardized text:
- We are sorry but this event is filled to capacity. To be added to the waitlist, please email XXXXXXX.
- Note: XXXXXX is usually events@uwo.ca but should be amended as appropriate for the event.
- Enter the following standardized text:
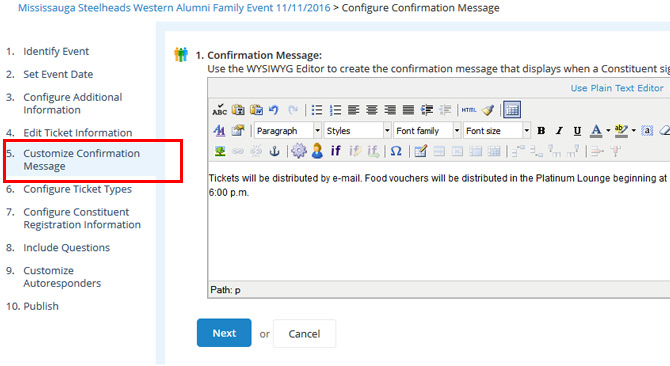
Insert confirmation message
- In the WYSIWYG editor, enter the following text or text that suits your particular event:
- Thank you for registering to attend this XXXXXX event. We look forward to welcoming you.
- XXXXX is usually “Western Alumni” but if the event is not hosted by Alumni Relations & Development on behalf of The University of Western Ontario Alumni Association, the text should be modified.
- NOTE: The confirmation message is shown to registrants on a web page displayed after their registration has been processed. This is the one item you CANNOT see a preview of in Luminate Online.
- The confirmation message appears as follows with the text in grey automatically inserted by Luminate Online and underlined copy being linked
Dear Constituent,
Event Name:
Date & Time:
Location:
# of guests attending
Thank you for registering to attend this XXXXXX event. We look forward to welcoming you!
Questions & registrant’s responses
Return to event details
Return to Calendar
Configure ticket types
To begin the process click the Add Type button
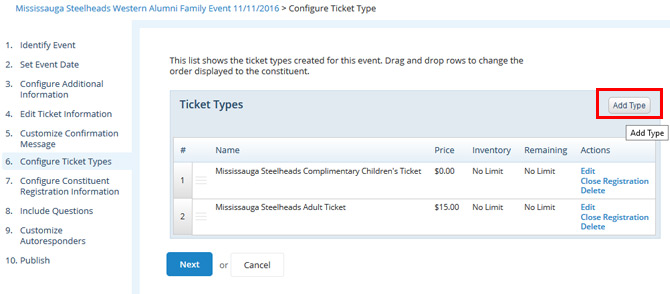
Then edit the ticket information.
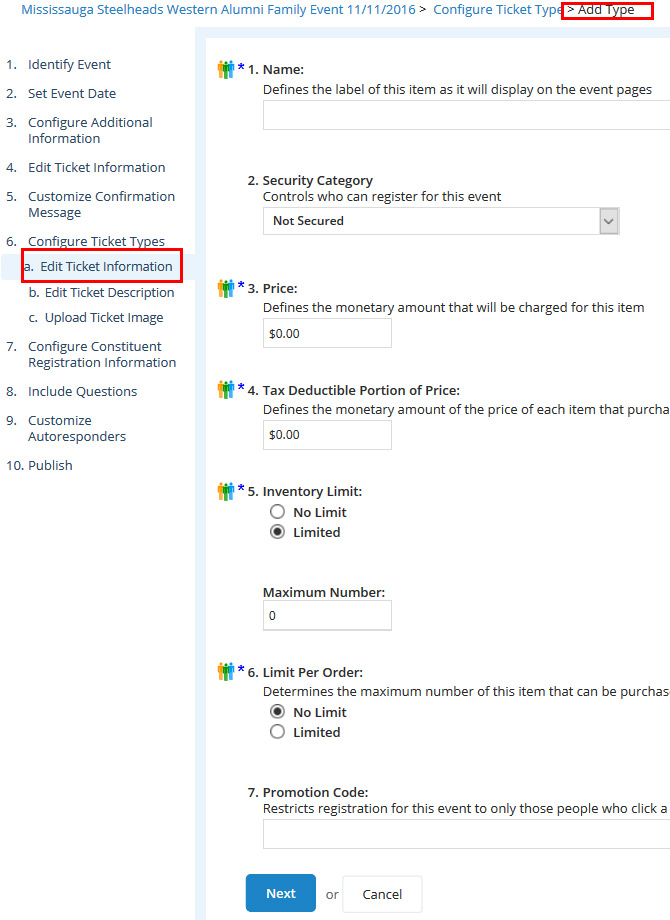
- Name
- The name of the ticket class should be descriptive if there is more than one ticket class (i.e. Senior, Adult, Child). If there is only one ticket class, the name can be similar to the event name.
- Security Category
- Leave the Security Category field set to “Not Secured.” If you need to limit access to a distinct group of people, contact Ericka.
- Price
- Enter the monetary value for the ticket.
- Tax Deductible Portion of Price
- Enter 0 in the Tax Deductible field UNLESS the event is a fundraiser and a portion of the ticket price is a donation.
- IF the event is a fundraiser and a portion of the ticket price is a donation, you must first contact Annual Giving (Kendra.lealess@uwo.ca) and Finance & Budget (vyeung27@uwo.ca). You must also notify Mark (mkoopma@uwo.ca)
- If it is a fundraising event, enter the full ticket cost in the Price field and the gift portion in the Tax Deductible field. Luminate Online will generate a receipt for the Tax Deductible portion.
- Inventory Limit
- Leave No Limit selected if space is unlimited for this event.
- Or, choose Limited and enter the total number of tickets that can be purchased in the field that displays.
- Limit Per Order
- You must set a limit per order to avoid accidental mass registration.
- Promotion Code
- To restrict this ticket purchase to only someone who has this code, enter a code (of letters and/or numbers). Note that you must notify the people who can use this code (for example, by sending an email).
- Contact lo-support@uwo.ca if you wish to use a Promotion Code.
Click the Next button at the bottom of the Edit Ticket Information screen to proceed to the Edit Ticket Description screen.
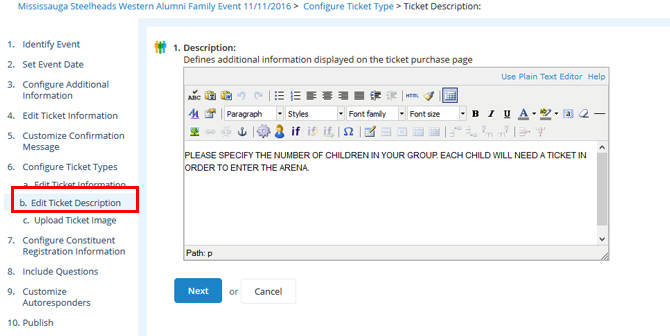
- Edit Ticket Description
- This step is optional. It is a good idea, however, if you have more than one ticket type or if you want to highlight what is included with a ticket purchase.
Click the Next button at the bottom of the Edit Ticket Description screen to proceed to the Upload Ticket Image screen.
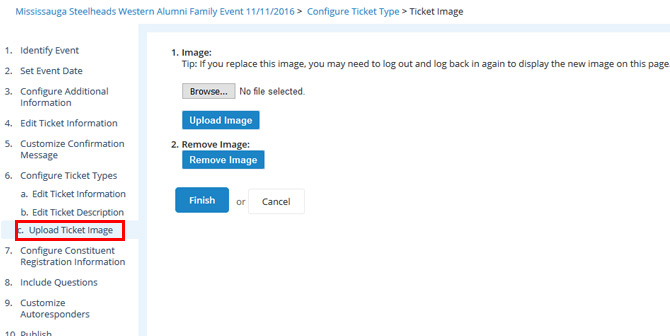
- Upload Ticket Image
- This step is not required
CLICK THE FINISH BUTTON TO RETURN TO THE CONFIGURE TICKET TYPES PAGE (if additional ticket types are required, repeat the process above)
Once you have the desired number of ticket types, click the Next button under Configure Ticket Types to move onto the Configure Constituent Registration information.
Configure constituent registration information
- Luminate Online will always require registrants to enter First Name, Last Name and Email Address as part of the registration process. For data integrity purposes, additional constituent registration information is collected on Western Alumni event pages.
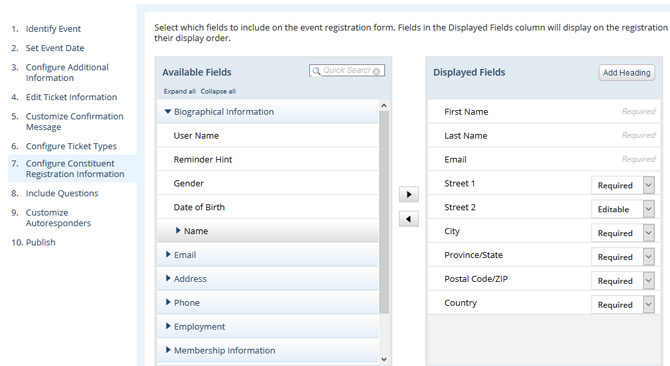
- On the Configure Constituent Registration Information page:
- In the Available Fields column, open the Address accordion
- Open the second Address accordion
- Add the following fields (and their default settings) to the Displayed Fields column:
- Street 1 (required)
Street 2 (editable)
City (required)
Province/State (required)
Postal Code/ZIP (required)
Country (required) *be sure to select country and NOT county
- Street 1 (required)
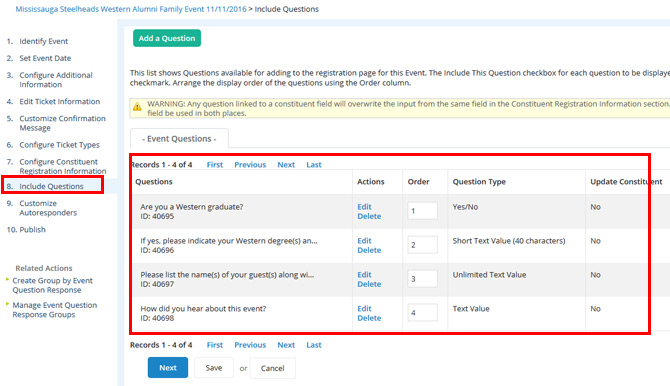
Add event questions
- Four questions are standard for all events and must be added:
- Are you a Western alumna or alumnus?
- mandatory to answer
- Question Type – Multiple Choice Single Response (radio)
- Please enter your Western degree and graduation year (i.e. BA’83):
- Question Type – Short Text Value
- Please enter your guest name(s) and Western grad year(s), if applicable:
- Question Type – Text Value
- Are you a Western alumna or alumnus?
- Other questions relevant to your event may also be added. For example:
- Daytime phone number
- Entrée selection
- Team members’ names
- If you need assistance adding questions, please see Appendix C: Question Types and Appendix D: To Add a Question
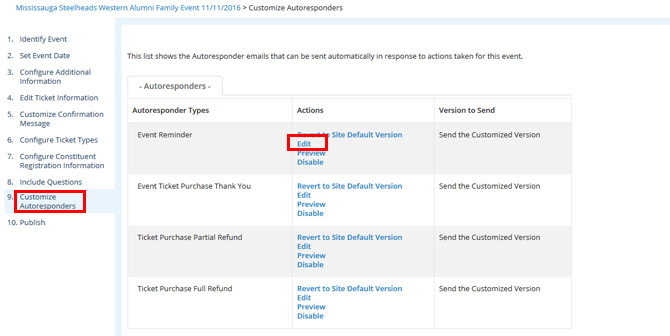
Autoresponders
Edit reminder autoresponder (optional)
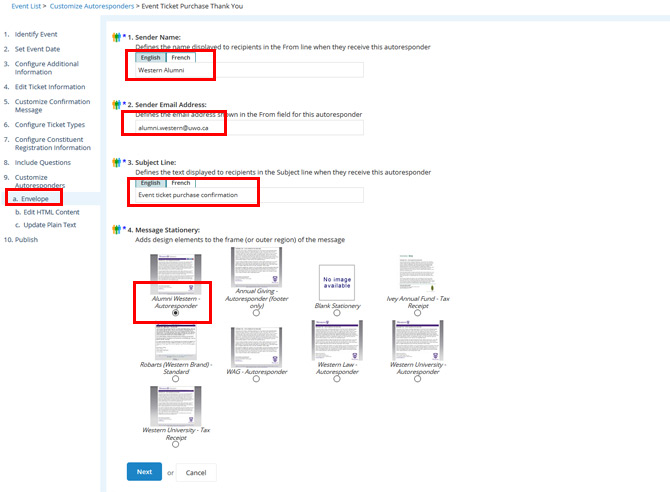
- The Event Reminder autoresponder envelope is pre-populated as follows:
- Sender Name: Western Alumni
- Sender Email Address: alumni.western@uwo.ca
- Subject Line: Event Reminder
- Stationery: Alumni Western Autoresponder – one column with top nav
- The Event Reminder autoresponder (HTML & plain text) is pre-populated. Click preview in the Actions column beside the autoresponder.
- NOTE: the text in the square brackets are variables pulled from the Convio database and will display the actual event name, date, etc in the autoresponder received by constituents.
- If a Project Lead chooses to use the pre-populated Event Reminder, no action is required.
- If a Project Lead wishes to modify the Event Reminder:
- Click “Edit” in the Actions column beside the autoresponder
- Modify the fields on the Envelope screen
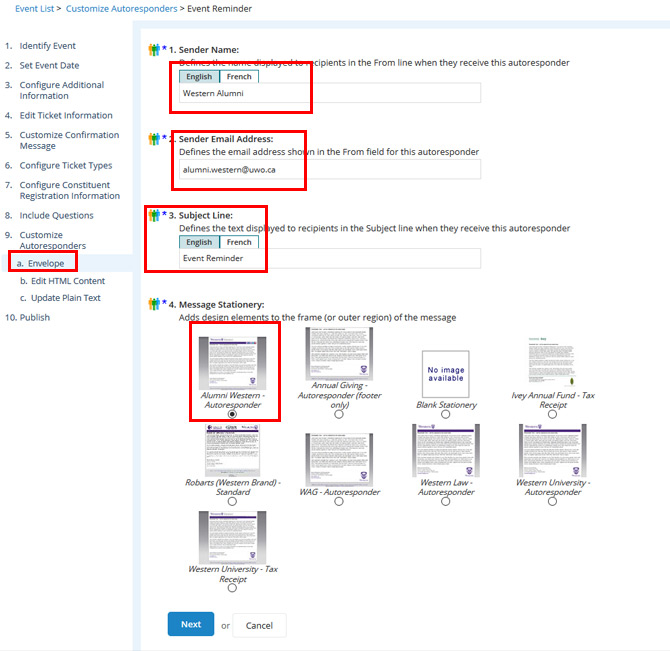
- Sender Name
- Can be expanded to include the name of the Branch or Chapter hosting the event (ex: Western Alumni Waterloo Region)
Can be changed to a program name if the event is part of a series of events hosted on a regular basis (ex: Backpack 2 Briefcase or Senior Alumni Lecture Series) - If the event is hosted by a group other than Alumni Relations & Development on behalf of the Alumni Association, the sender name should be modified accordingly (ex: Schulich School of Medicine & Dentistry)
- Can be expanded to include the name of the Branch or Chapter hosting the event (ex: Western Alumni Waterloo Region)
- Sender Email Address
- Should remain alumni.western@uwo.ca if the event is hosted by Alumni Relations & Development on behalf of the Alumni Association
- If the event is hosted by a group other than Alumni Relations & Development on behalf of the Alumni Association, the sender email address should be modified accordingly (ex: events@schulich.uwo.ca)
- Subject Line
- May be changed at the Project Lead’s discretion
- Message Stationery
- Should remain “Alumni Western – Autoresponder” if the event is hosted by Alumni Relations & Development on behalf of the Alumni Association
- If the event is hosted by a group other than Alumni Relations & Development on behalf of the Alumni Association, the stationery should be changed to “Western University – Autoresponder”
Click the Next button the bottom of the Envelope screen to proceed to the Edit HTML Content screen.
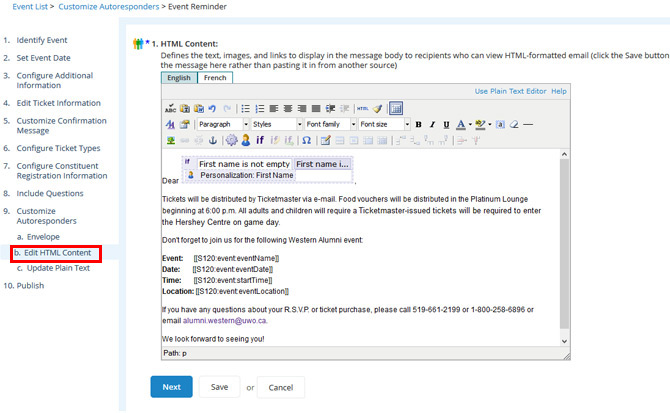
- If just making minor edits to the HTML content of the Event Reminder (i.e. adding a paragraph reminding guests where to meet or changing the contact phone number) it is okay to do so within the pre-populated content so long as you DO NOT change any of the [[S120:]] variables
- If you want to modify any of the variables, it is best to delete all of the content after the personalization and add your own copy from scratch.
- Click the Next button to display the Update Plain Text page.

- If you’ve made any changes to the HTML content, you’ll need to ensure these are reflected in the plain text version of the Event Reminder by clicking the Update Plain Text button at the top of the page.
- Review the plain text and:
- Delete extra URL references
- Add descriptive lead-in words for the URLs that remain
- Remove additional line breaks by placing the cursor after the last letter in the row and selecting “Delete.” Once the text from the following line is beside the cursor, use the space bar to add a space.
- Click the Finish button. The Event Reminder autoresponder closes and the Customize Autoresponder page displays again.
- On the Customize Autoresponder page, click “Preview” next to the Event Reminder.
- Proof the preview closely for proper spelling, grammar and punctuation as well as accurate information. This is the only place you have to examine the Event Reminder as it will not be seen during testing or review.
Edit ticket purchase thank you autoresponder (optional)
- The Event Ticket Purchase Thank You autoresponder envelope is pre-populated with the following:
- Sender Name: Western Alumni
- Sender Email Address: alumni.western@uwo.ca
- Subject Line: Thank you for registering
- Stationery: Alumni Western Autoresponder – one column with top nav
- The Event Ticket Purchase Thank You autoresponder (HTML & plain text) is pre-populated. Click preview in the Actions column beside the autoresponder.
- If a Project Lead chooses to use the pre-populated Event Ticket Purchase Thank You, no action is required.
- If a Project Lead wishes to modify the Event Ticket Purchase Thank You:
- Click Edit in the Actions column beside the autoresponder
- Modify the fields on the Envelope screen
- Sender Name
- Can be expanded to include the name of the Branch or Chapter hosting the event (ex: Western Alumni Waterloo Region)
- Can be changed to a program name if the event is part of a series of events hosted on a regular basis (ex: Backpack 2 Briefcase or Senior Alumni Lecture Series)
- If the event is hosted by a group other than Alumni Relations & Development on behalf of the Alumni Association, the sender name should be modified accordingly (ex: Schulich School of Medicine & Dentistry)
- Sender Email Address
- Should remain alumni.western@uwo.ca if the event is hosted by Alumni Relations & Development on behalf of the Alumni Association
- If the event is hosted by a group other than Alumni Relations & Development on behalf of the Alumni Association, the sender email address should be modified accordingly (ex: events@schulich.uwo.ca)
- Subject Line
- At the Project Lead’s discretion, the event name may be added to the end of the subject line (ex: Thank you for registering for Last Lecture)
- Message Stationery
- Should remain “Alumni Western Autoresponder – one column with top nav” if the event is hosted by Alumni Relations & Development on behalf of the Alumni Association
- If the event is hosted by a group other than Alumni Relations & Development on behalf of the Alumni Association, the stationery should be changed to “Western University – Autoresponder”
Click the Next button the bottom of the Envelope screen to proceed to the Edit HTML Content screen.
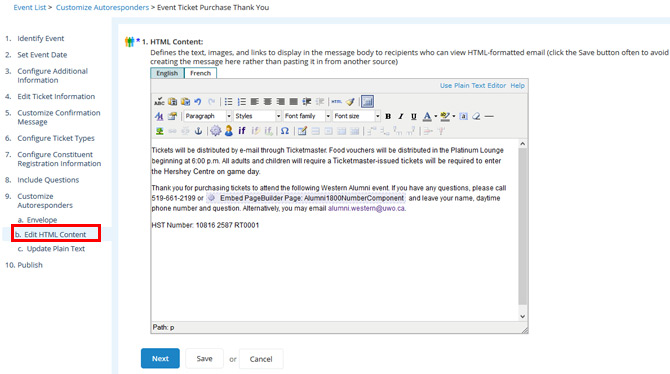
- NOTE: the only copy in the Ticket Purchase Thank You autoresponder that can be changed is the pre-populated copy.
- If you add any additional information, it will appear after the “519-661-2199 or 1-866-447-1044 or email alumni.western@uwo.ca.” text.
- Click the Next button to display the Update Plain Text page.
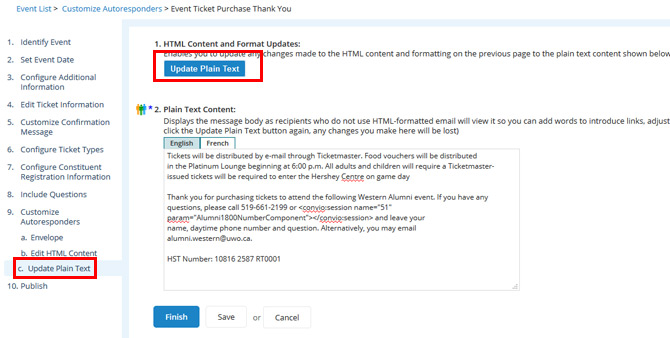
- If you’ve made any changes to the HTML content, you’ll need to ensure these are reflected in the plain text version of the Ticket Purchase Thank You by clicking the Update Plain Text button at the top of the page.
- Review the plain text and:
- Delete extra URL references
- Add descriptive lead-in words for the URLs that remain
- Remove additional line breaks by placing the cursor after the last letter in the row and selecting “Delete;” once the text from the following line is beside the cursor, use the space bar to add a space
- Click the Finish button. The Ticket Purchase Thank You autoresponder closes and the Customize Autoresponder page displays again.
- On the Customize Autoresponder page, click “Preview” next to the Ticket Purchase Thank You.
- Proof the preview closely for proper spelling, grammar and punctuation as well as accurate information. This is the only place you have to examine the Ticket Purchase Thank You as it will not be seen during testing or review.
Check ticket purchase partial refund autoresponder
- Project Leads may not issue ticket refunds. All ticket refunds must be processed by Tish Fan. Requests for ticket refunds should be emailed to wfan46@uwo.ca.
- The Ticket Purchase Partial Refund autoresponder will only be sent if a constituent’s ticket purchase is partially refunded.
- Project Leads should not modify the Ticket Purchase Partial Refund autoresponder as it is pre-set.
- For information purposes only, the content for this autoresponder can be seen by clicking preview in the Actions column beside the autoresponder.
Check ticket purchase full refund autoresponder
- Event Leads may not issue ticket refunds. All ticket refunds must be processed by Tish Fan. Requests for ticket refunds should be emailed to wfan46@uwo.ca.
- The Ticket Purchase Full Refund autoresponder will only be sent if a constituent’s ticket purchase is refunded in full.
- Event Leads should not modify the Ticket Purchase Full Refund autoresponder as it is pre-set.
- For information purposes only, the content for this autoresponder can be seen by clicking preview in the Actions column beside the autoresponder.
Finishing up
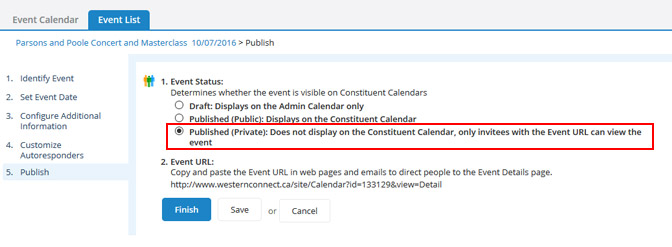
Make the event available for testing
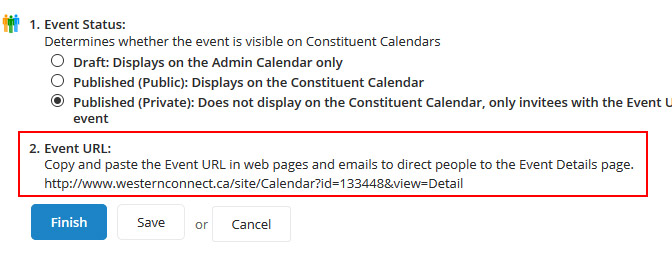
- Select Publish in the left sidebar of the Configure Additional Information Screen
- On the Publish page, set the Event Status to “Published (Private): Does not display on the Constituent Calendar, only invitees with the Event URL can view the event”
Test the event
View the event like an end user
- On the Publish page, select and copy the Event URL. Paste the URL into a new tab in your web browser.
Proof the event from the end user perspective
- Is the event appealing? Would you attend based on the description?
- Is all of the information correct?
- Date
- Time
- Location
- RSVP/Ticket Purchase deadline (if applicable)
- Ticket prices (if applicable)
- Does the copy read well? Are the spelling, grammar, and punctuation correct?
- Does the event details page contain all of the information a constituent needs to know to make a decision about attending the event?
- Does the layout of the event details page look okay?
- Do all of the links work?
- Contact text link in the accessibility statement
Make edits & send event page url to your reviewer(s)
- Edits are made in Luminate Online and can be viewed by returning to the end-user view of the event page and choosing the refresh button in the browser.
- Send the event page URL to your reviewer(s).
Review the event
The following tasks are the responsibility of reviewers. The reviewer must be someone other than the Project Lead.
The Reviewer’s role relates largely to editing and fact checking. You are an extra set of eyes for the Project Lead to make sure all event information is accurate and well written.
Proof the event details page
- Is the event appealing? Would you want to attend based on the description?
- Is all of the information correct?
- Date & Time
- Location
- RSVP/Ticket Purchase deadline (if applicable)
- Ticket prices (if applicable)
- Does the copy read well? Are the spelling, grammar, and punctuation correct?
- Does the event details page contain all of the information a constituent needs to know to make a decision about attending the event?
- Does the layout of the event details page look okay?
- Do all of the links work?
- Contact text link in the accessibility statement
Provide feedback
- Send edits and feedback to project lead.
Edit event & make it public
The following tasks are the responsibility of the Project Lead:
- Incorporate edits and feedback from reviewer as appropriate
- Review event changes
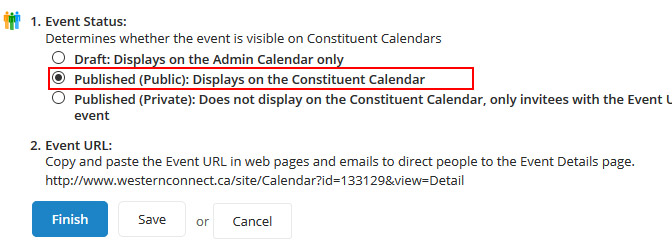
- Update the event status to “Published (Public): Displays on the Constituent Calendar”
Appendix A
Insert/edit image
- In the top left of the WYSIWYG Editor, click the Insert/Edit Image icon (
 ).
).
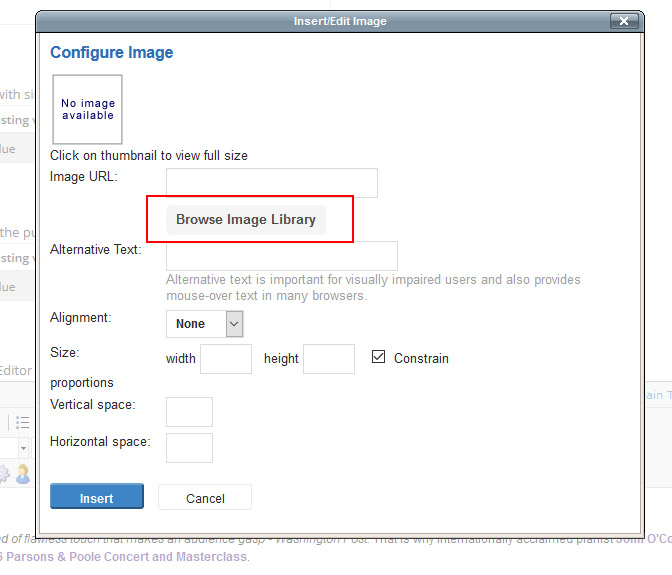
- In the Configure Image pop-up window, click the Browse Image Library button
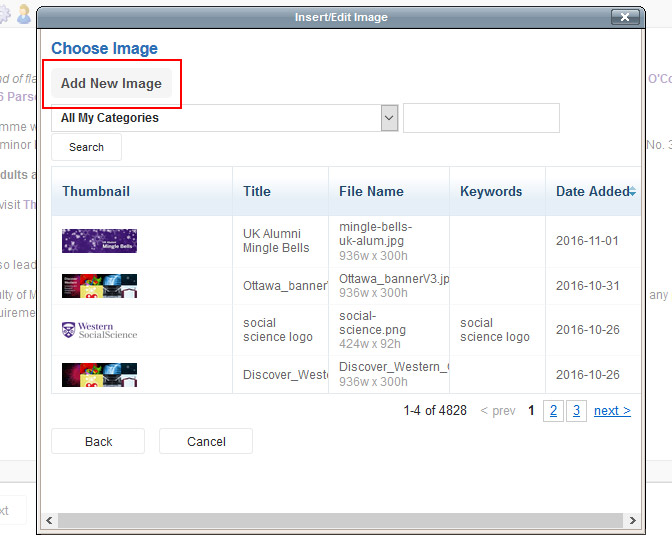
- In the Choose Image pop-up window, you can insert an image that is already in the Image Library. To see a shorter list of images, use the Search feature, or choose to view only those images that have been placed in a certain security category.
- Alternatively, you can click the Add New Image button to add an image to the image library. Be sure to give the image a graphic title and search keywords to comply with accessibility standards.
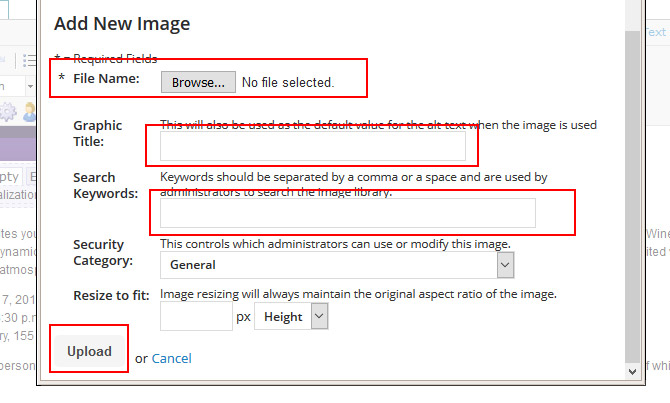
- Once you have found or added the image you want to insert, click on it.
- Click the Insert button to place the image in the event description.
Appendix B
Question types
| Question Type | Explanation |
|---|---|
| Caption | Use the WYSIWYG editor to add instructions, graphics or other separating elementsto list of questionpresented as an unnumbered textual instruction or informationabove a question or dividing a set of questions. |
| Date Value | Question presented with a Month, Day, and Year drop-down lists that people use to select a date. |
| Interest Category | Used to get users to set their own interests question presented with Web and Email Interest checkboxes that people can select to have any available. Web content associated with the interest automatically displayed to them on the Web site when they log in or to receive emails associated with an email interest. |
| Multiple Choice Combo Box | Question presented with answer selections in a drop-down list from which people may make a single selection and an Other field into which they may enter a text value if none of the choices in the drop-down list areappropriate. |
| Multiple Choice/Multiple Response | Question presented with answer selections in a drop-down listfrom which a person may make more than one selection/applicable responses. Minimumand maximum selections configurable. |
| MultipleChoice/Single Response | Question presented with answer selections in a drop-down list from which a person may make one selection only. Question presented with answer selections as a list of radio buttons from which a person may make one selection only. |
| Numeric Value | Question presented with a text entry field into which a person will enter numbers as a response. |
| Rating Scale | Question presented with answer selections as a list of radio buttons from which a person may make one selection only. |
| Short Text Value | Question presented with a text entry field into which a person can enter up to 40 letters, numbers, or spaces from the keyboard. |
| Text Value | Question presented with a text entry field into which a person can enter up to 255 letters, numbers, or spaces from the keyboard. |
| Unlimited Text Value - DO NOT USE | When you are adding the questions, please do NOT use the Unlimited Text Value question type. Instead, wherever you would have used that, please use Text Value. Unlimited Text Value question answers do not sync into BBCRM and will be missing from the registration in the BBCRM Event Module. |
| Yes/No | Question presented with YES and NO as the answer selections in a drop-down list from which a person may make one selection only. |
Appendix C
Adding event questions
- On the Include Questions screen, click the Add Question button.
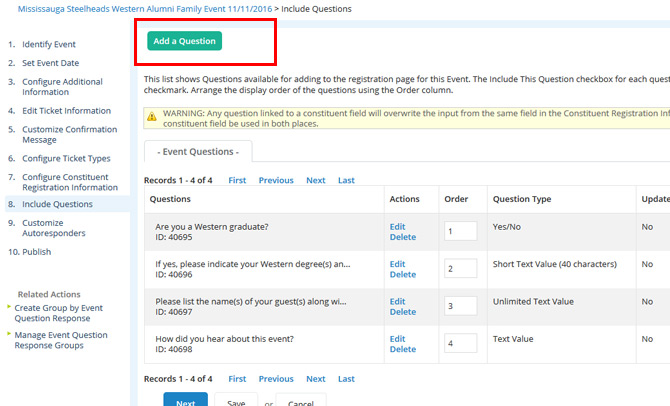
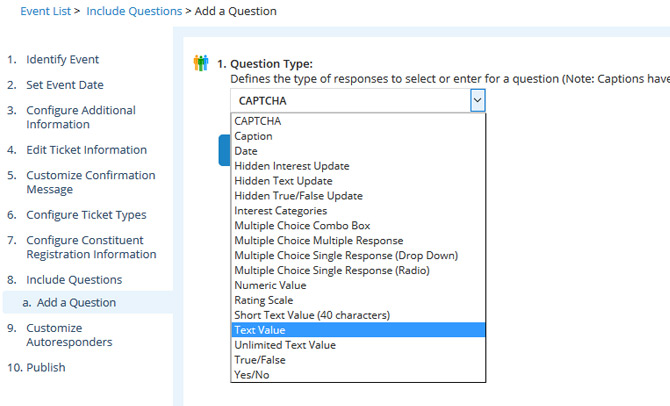
- Select the Question Type from the drop-down menu. Question Type defines the type of responses to select or enter for a question (See Appendix B: Question Types for help)
- Edit the question; the options on this screen will vary depending on question type.
- To view your question/response formatting, choose Preview. Your new question and response area displays in a separate browser window.
- After inspecting your work, close the preview window, make any changes, and then preview your question again.
- When you are satisfied with its appearance, choose Finish. The Questions list page displays again with your new question in the list.
- Repeat the above process for each question you want to add to the event.